How To Complete The Last Voyage Of The ACS Free Market In The Outer Worlds 2

Are you baffled by the requirements to complete The Last Voyage of the ACS Free Market in The Outer Worlds 2? This quest takes place in Free Market Station, which houses several vendors with awesome wares. Still, there’s a mystery to solve, as well as a rather perplexing segment known as Otto’s Puzzle.
Investigating Free Market Station and Otto’s Puzzle
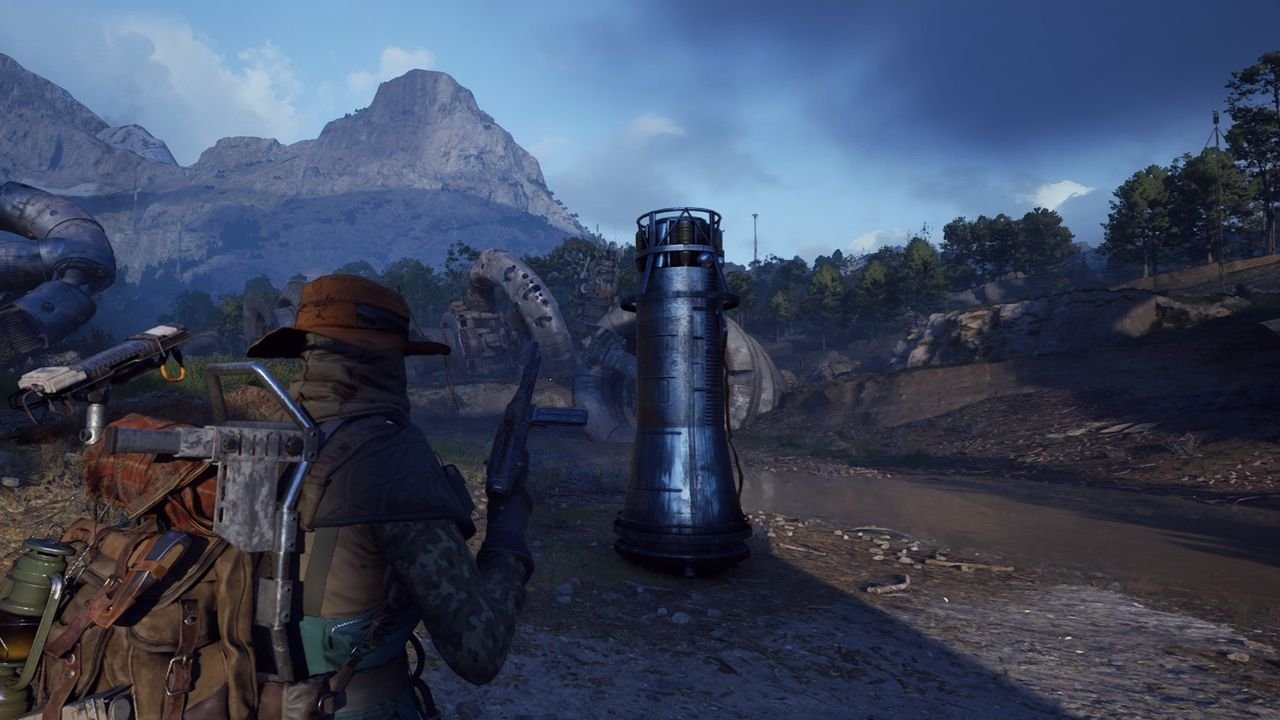
You’ll be able to travel to Free Market Station after completing the main objective in Paradise Island and the Vox Relay. Upon arriving at the location, you’ll see two people–Guard Seybold and Archivist Stallworth–having an argument. Chat with them to start the quest.
Note: The goal in this particular mission is to collect information for Stallworth regarding a crashed ship. Stallworth has three questions for you, and you’ll receive additional dialogue responses if you’re able to conduct your investigation thoroughly. All of these tasks have skill checks, too, so make sure you’ve selected the best skills in the game.
Otto’s Information: Part 1 – Engineering skill check or purchases

For The Outer Worlds 2 Last Voyage of the ACS Free Market quest, you’ll want to go to the vendor area to find an NPC named Otto Riesling. He’s the proprietor of the Oddments and Gubbin stall. There are three methods to get the information that you need:
- Pass the Engineering 5 skill check.
- Purchase approximately 1,000 bits worth of items and select the dialogue response.
- The third and final method also nets you extra rewards, but there’s an issue with it. (More on this below.)
Otto’s Information: Part 2 – Otto’s Puzzle

Otto’s Puzzle in The Outer Worlds 2 is downright perplexing. Here’s what you need to know:
- From your ship’s landing area, keep left until you see a Rift Anomaly. Go through the crawlspace, then make another turn and climb the ladder.
- You’ll see a note next to several switches that you can interact with, but you won’t actually notice anything out of the ordinary with your naked eye.
- If you want to see the invisible wirings, you need to acquire the N-Ray Scanner gadget, which comes from the Golden Ridge region. You automatically obtain it as part of the main quest arc in that zone, but it’s definitely a long trek.
Assuming you already have the N-Ray Scanner, just activate it while looking at Otto’s Puzzle. You’ll notice the purple wires connecting each of the switches. Here are the steps:
- You have to make the lights from top to bottom light up in sequence. That means pulling the levers in the correct order–i.e. from right to left–based on how they’re connected via the wires.
- For the topmost row, that means interacting with: 1A and 1B at the top, followed by 1C (the second from the left in the middle row), then 1D (the leftmost switch in the bottom row).
- Do the same for the two other segments once they light up, all without pressing a switch a second time.
There’s just one problem: This puzzle seems to be bugged at the moment. We were able to complete it during our initial playthrough a few days ago. Unfortunately, it seems a recent patch has caused issues, as has been reported by other players. In any case, you can make a mental note regarding the Otto’s Puzzle location so you can return later on.
ACS Free Market Crash Site Information

You can glean additional information while in the junkyard near the puzzle area. There are two ruined sections that you can investigate:
- One requires the Brawny trait or Sneak 5.
- The other requires Engineering 8.
Prospero Paolo’s Information

You can also talk to an NPC named Prospero Paolo for The Outer Worlds 2 Last Voyage of the ACS Free Market quest. You’ll find him in the 2nd Choice saloon just past the vendor area.
Before Prospero Paolo divulges anything, you need to hand over a bottle of Iceberg Aged Whisky. This item comes from a nearby bar with an NPC named Chef de Mechanique. Unfortunately, Chef de Mechanique won’t sell the item because Prospero is asking for it.
- One option is to pass the Hack 3 skill check when talking to Chef de Mechanique.
- Another option is to go through the crawlspace outside the bar. This allows you to stealthily open the safe behind the NPC as long as you have Lockpick 5.
Sub Rosa Archive Information

Finally, you can gather more info from the Sub Rosa Archive, which is in the cellar below the 2nd Choice saloon. This can be accessed by going through the ventilation shaft at the bar/club area. Alternatively, if you’ve already completed the quest to recruit a companion named Tristan, then this section should be open.
Down below, you’ll find a Sub Rosa guard who’s sleeping next to a locked terminal:
- You can brute force the terminal password if you have Hack 8.
- Alternatively, if you selected the Lockpick – Pickpocket perk, you can steal the document from the guard.
- Lastly, depending on your Sneak skill, you can just waylay the guard while they’re asleep.
How to respond to Archivist Stallworth

Now that you’ve gathered the information that you need, it’s time to chat with Archivist Stallworth. Here are some important caveats:
- Stallworth has three questions:
- How did the ACS Free Market meet its end?
- What occurred in the ship’s final moments?
- Were there any contributing factors to the crash?
- As mentioned earlier, the info you’ve collected should add new dialogue options to each of these questions. You can pick any of these options to gain bonus bits and XP.
- However, you should also avoid the choosing uncertain responses, such as:
- Question 2 reply: “A lot of screaming and running around, probably?”
- Question 2 reply: “[Sickly] I don’t want to think about it.”
- Question 3 reply: “Uh, not sure.”
- Question 3 reply: “[Lie] I’m pretty sure the ship was sabotaged by the Order.”
When you’re done, Stallworth will thank you for your efforts. There are a couple of dialogue options that yield bonus reputation with the Sub Rosa faction.
Note that there’s one reply that you shouldn’t pick: “[Attack] Nobody uses me. Prepare to die.” This causes Stallworth, along with other guards, to turn hostile. This leads to a major reputation drop with the Sub Rosa faction, which is kind of a pointless outcome.
What about Guard Seybold’s safe?

Now, you might be curious as to what happened to Guard Seybold. After all, she’s the one being rude to Archivist Stallworth at the start of the quest.
Well, if you check the small building to the right of the ship’s landing pad, you should see a large safe. Open the adjacent room and crouch/stealthily approach Seybold who has her back turned. If you have the Pickpocket perk, you can grab the key without being detected. Use it to unlock Seybold’s Safe to earn additional bits and XP. Oh, and don’t forget to take the collectible card on the desk as well.
That about does it for our guide on The Last Voyage of the ACS Free Market quest in The Outer Worlds 2. Note that many other quests can be found in various regions. Examples include Pursuit of Purloined Propaganda, Pursuit of the Partite Pentaptych, and Hazard a Gas.
Black market smugglers? Autocratic regimes? Rampaging Raptidons? Invisible cultists that can only be seen if you wear special goggles? These shenanigans need not cause any alarm because we’ve got you covered in our The Outer Worlds 2 guides hub.